Wednesday, April 18, 2012

PIZZA! PIZZA! PIZZA!

A healthier pizza for your toddler (or any family member) in 10 minutes!!! Y'all, it really is a super quick meal!

If you are anything like me you try to feed your children the best you can. Sometimes I don't do as well as I would like, but my husband and I sure do try! We have always made our son's food, he has never even tasted jar baby food! So now that he is older (he is 2!) we still try to make as much as we can from scratch.

Like most kids, he loves pizza so that is what I made this week.
Here is a quick and totally yummy pizza you can make for your little one (and we like it too!)

Remember the spaghetti sauce I "spruced" up earlier in the week? Well...tada! That is what I used for pizza sauce...just pull some out of the freezer!


So, using that as the pizza sauce...gather the rest of the ingreidents:

Extra Virgin Olive Oil

Mozzarella Cheese

Whole Wheat Sandwich Thins

THEN....Pre Heat oven to 350

Spread a small amount of EVOO on the whole wheat sandwich thins, then spread the homemade sauce (you could use any sauce but its best to add the pureed veggies, the kiddos get the vegetables they need and don't even know it!)

Sprinkle on as much or as little cheese as desired...my son likes a lot! Throw on a baking dish, no cooking spray needed.

Bake for 8 minutes (y'all, only 8 minutes!)

Annnnddd.....TADA! A yummy pizza WITHOUT the grease! Awesome!


You could always add your (or your little ones) favorite toppings! What do you think?

Friday, April 13, 2012

Multiplication Madness!

I am loving Anchor Charts lately. It is not something other teachers at my school are doing, but because of the wonderful site Pinterest and all the great blogs I have read, I am a fan!

When I was nearing the multiplication unit for my fourth graders I had started (as always) looking for new lesson ideas. As we got into the unit I had a couple students who kept missing steps. Every single time they would miss one or two steps and of course, get the entire thing wrong. It was so frustrating as a teacher because they had their facts right, it was the process. Sometimes it was simply not putting the place holder.

Once I realized this pattern I searched and googled and searched and googled for a good tool or Anchor Chart and could not find ANY! So I made my own! The kids really loved it and we posted it up for them to reference.


When trying to figure out the easiest way to do this I decided to use color coding. The brown numbers are the numbers already used in the step before. The red is the answer on the current step. For example on number 5 I circled 8 and 9 in red to show that was the current step, then wrote the answer, 78 in red. I used blue to highlight or spell out what the step was. For example, on number 1 I drew an arrow from the 4 and wrote "carry me" to remind students to carry (that is a HUGE problem for some). I also wrote out 7x7=49 to show, again, that was the only math problem they were working on in the first step.

When I introduced it I showed it to the class like this:
I went through each step with them and as we got to a new one I would pull off the large sticky. I really wanted them to focus on each step by itself. After we went through each step I had them work out the problem in their spirals.

The student's that were having problems absolutely LOVED this and actually thanked me! I have noticed students referencing it from time to time and I have to say that their multi-step multiplication improved greatly!

Do you have any good tips? Visuals are the BEST but sometimes hard to think of, especially with multi-step math!

Thursday, April 12, 2012

Oldies, but Goodies

So I didn't have this blog up and running around Valentine's day but I have to share these two super cute V-day projects!

I work at a Catholic school so I realize that most teachers can not put up this bulletin board, but I still wanted to share.

I got the idea from Bulletinboardideas

My board was not long enough so I had to tweak it.
My board is not really this wide, but to make it fit I just extended the black paper on my chalk board and made the border fit. Looks good to me! I didn't want to use actual cut out letters, I figured it would be too costly. So I used die cuts. I am not gonna lie, to cut out the letters themselves took an entire off period. And then it probably took me two full days to get it up the way I wanted it.

Part of the problem I encountered was that I would staple them up and then forget a letter and have to take all the other letters down again. I have since changed my method to doing bulletin boards...I use tacs first to make sure the placement looks good. THEN I staple. This sure has saved me a couple headaches!

Anyway, here is the board.....


Next cutie to share...

I decided against a theme for my classroom this year. Last year it was western, but I thought it was too dark in my room. I needed to brighten it up! This year I just went with bright colors. It's actually a lot of fun. I will post pictures of my classroom soon. Anyway, at my school 4th-8th grade have lockers and the lockers are in the classroom. To keep locker time from being overcrowded we put alternating signs on the lockers and call one "group" or sign at a time. (I will post all this soon too!)
It was hard to find locker theme to go with my bright colors so I just went with owls and moons. I like it!

So when I was trying to find a cute note to go with the students' Valentine treats I knew I had to choose this owl one from Living Locurto I just had to use them! Here are the bags for the kiddos!


What cute things did you do? I am always saving ideas away for next year!!!

Spaghetti Please!

First of all, HAPPY EASTER! I hope everyone had an amazing weekend full of family, friends and laughter!

With Easter comes the dreaded.....candy! Oh my gosh y'all...my two year old ate every piece of candy that grandma, aunts and cousins gave him (behind my back of course!). So, I had to make a good batch of homemade meals for the little guy this week.

Spaghetti is easy and always a fave! You can use any spaghetti sauce you like (we prefer organic) boil broccoli, set aside (save some of the boiled water), boil carrots (save some of the boiled water). Puree broccoli and carrots, mix in sauce and you are DONE! Serve with wheat pasta of your choice!


Tuesday, April 3, 2012

Do you have windows?

I have an entire wall of windows. I LOVE IT! BUT....it takes up useful wall space. This year I found a way to utilize the space and I am really liking how it worked out.

The students are writing a mystery for our creative writing class. We are using a lesson I have really enjoyed doing in the past. I use the photos, titles, and captions from the book "The Mysteries of Harris Burdick" by Chris Van Allsburg.

I don't know if anyone else has these problems, but my students always think they write one draft, then the final! It can be very frustrating. I thought if they had a good visual to help them SEE the writing process it might help them realize how many steps it takes. So I came up with the following:

First, I had to decide what steps I wanted to check off before they could move on. I think this would differ depending on what the students were writing. I chose to use the following; brainstorm, lead, character web, setting map, rough draft, peer edit, rewrite, teacher conference, and final copy.

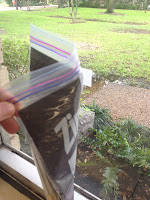
Next, I made each step a label and taped to the back of a Ziploc baggie (I also lined the baggie with black construction paper that I pre-cut so that the Ziploc logo would not show through).

Here is a close up of two of the steps. One is empty, as no students have gotten to that point in their writing yet. One you will see pencil cut outs in (after I have checked and approved one step, they move the pencil with their student number on it to the next step). Students like moving their pencils, and its a quick visual for me to see about how many students are in what step of the writing process.


At the last minute I decided to attach the baggies with Velcro squares. That way students can pull off the bag and get their pencil out to move it. I was worried if they weren't able to pull the bag off the bags would start ripping.


Here is a view of the window...don't I have a great view???

My Very First Post...On My New Blog

First a little about myself....

I am a Catholic wife, mother to a sweet two year old, a Fourth Grade Teacher, owner of an event planning business, Busy Chick Planning, and an avid Pinterest searcher! I decided to start this blog because I find so many wonderful ideas on Pinterest and other teacher's and event planner's blogs. I try these things, and I LOVE them! I want to share my findings with others.

First find for my new blog are these very yummy granola muffins from Sugar Free Mom

Here they are before they went into the oven...


And here are just a couple after they were done. Threw half a batch in the freezer...VERY EASY and HEALTHY breakfast for the hubs, myself and the toddler!


Let me know if you try and like it also!

Happy, Healthy Munching!!!
Tamara